
Inhaltsverzeichnis
- First, Assess Your Goal: What Do You Want to Do with the Hole?
- Solution 1: Installing a Smaller Downlight in a Larger Hole (The Smart Fix)
- Solution 2: Patching the Hole Completely (The Perfect Finish)
- Solution 3: The Cover-Up – Quick and Creative Alternatives
- Choosing the Right Solution for You: A Comparison
- Final Word: Reclaiming Your Flawless Ceiling
- FAQ About How To Fix Downlight Holes
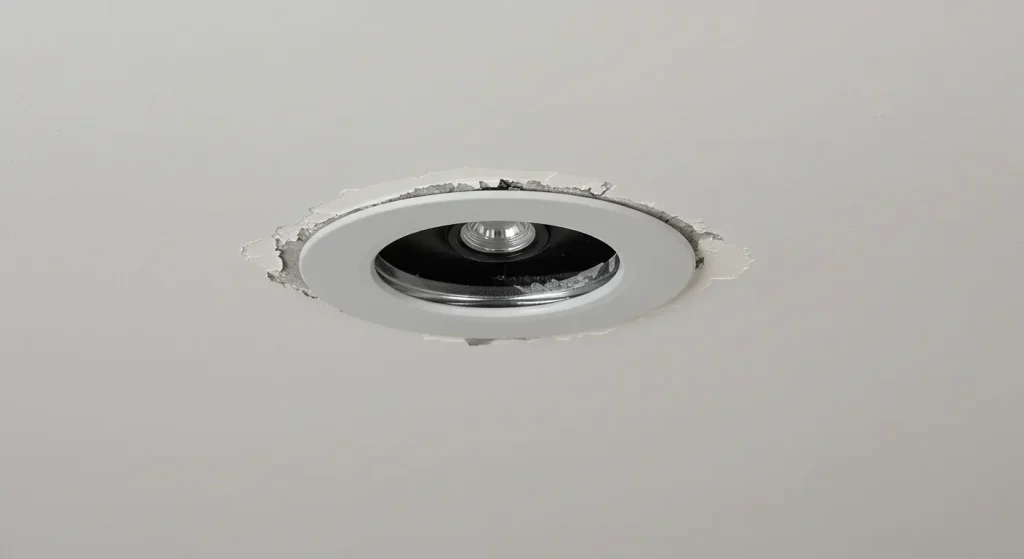
Whether it’s the ghost of a past renovation, an accidental slip of the hole saw, or you’ve simply decided to remove an old, unwanted recessed light, you’re left with the same nagging problem: an unsightly hole in your otherwise perfect ceiling.
It’s a common issue that can feel daunting. But don’t despair. Fixing a downlight hole is a very manageable project, and you have several excellent options, ranging from a quick, clever cover-up to a flawless, invisible patch. This isn’t just about repairing damage; it’s about reclaiming your ceiling and perfecting your space.
This is your complete, expert guide to fixing downlight holes. We’ll walk you through the three most effective solutions, breaking down each one into a clear, step-by-step process.
First, Assess Your Goal: What Do You Want to Do with the Hole?
Before you grab any tools, the most important step is to decide on your desired outcome. Your goal will determine the best solution.
- Goal 1: I want to install a new, smaller downlight in the existing large hole.
- This is a common scenario when upgrading from older, larger 5″ or 6″ fixtures to modern, smaller 3″ or 4″ LED.
- Goal 2: I want the hole gone completely for a smooth, flat ceiling.
- This is for when you are eliminating the light fixture entirely and want the ceiling to look as though the hole was never there.
- Goal 3: I want to cover the hole with a different type of fixture or a simple blank plate.
- This is a quick and practical solution if you don’t want to undertake a full drywall patch.
Let’s explore the step-by-step process for each of these goals.
Solution 1: Installing a Smaller Downlight in a Larger Hole (The Smart Fix)
You’ve found the perfect new LED downlight, but the hole from your old fixture is far too big. This is a classic problem, but luckily, there’s a brilliantly simple solution.
The Pro’s Secret Weapon: The “Goof Ring” or Reducer Trim
A goof ring, also known as a reducer trim or an oversized trim ring, is a flat ring, typically made of metal or plastic. It’s designed to fit around your new, smaller fixture, effectively extending its visible trim to cover the oversized hole. It’s an elegant solution that saves you from any drywall work.
Step-by-Step: Using a Goof Ring
- Safety First: Even though this isn’t major electrical work, it’s always safest to turn off the power at the circuit breaker before installing the new light.
- Measure Accurately: You need two measurements: the diameter of the existing hole in your ceiling, and the outer diameter of the trim on your new, smaller downlight.
- Purchase the Correct Goof Ring: You need a ring with an inner diameter that is slightly larger than your new fixture’s trim, and an outer diameter that is larger than your existing hole. They come in various sizes and finishes (white, black, brushed nickel) to match your new light.
- Install Your New Downlight: Following the manufacturer’s instructions, wire and install your new, smaller downlight into the ceiling hole. It will be held in place by its own spring clips, centered within the larger hole.
- Fit the Goof Ring: The goof ring simply slides up over the new fixture and sits flush against the ceiling, neatly covering the gap between the fixture’s trim and the edge of the oversized hole.
- Restore Power and Admire: Turn the power back on and enjoy your new, modern light in a flawlessly finished ceiling.
Solution 2: Patching the Hole Completely (The Perfect Finish)
If your goal is to make the hole vanish forever, a professional drywall patch is the answer. The secret to a great patch is patience and applying thin coats.
Gathering Your Tools and Materials
- Safety Gear: Dust mask and safety glasses.
- Drywall Patch: For a standard downlight hole (3-6 inches), a self-adhesive mesh patch or a “California” patch (a square of drywall with paper edges) works best.
- Joint Compound: Pre-mixed all-purpose joint compound is easiest for beginners.
- Tools: A 6-inch and a 10-inch taping knife, a mud pan, and a sanding sponge (medium and fine grit).
- Finishing: Primer and ceiling paint that matches your existing ceiling.
The Step-by-Step Drywall Patching Process
- SAFETY & PREP: If there is still wiring in the hole, turn off the power at the breaker and have an electrician safely terminate and make the wiring safe inside a junction box in the attic or ceiling cavity. Cover your floors and furniture with drop cloths.
- Clean and Prepare the Hole: Remove any loose paper or debris from the edges of the hole. The surface should be clean and dry.
- Apply the Drywall Patch:
- For a Mesh Patch: Center the self-adhesive patch over the hole and press it firmly onto the ceiling.
- Apply the First Coat of “Mud”: Using your 6-inch taping knife, apply a thin, even coat of joint compound over the mesh patch. Press firmly to push the compound through the mesh and into the hole. Extend the compound about 2 inches beyond the edge of the patch.
- Feather the Edges: With your knife, smooth the outer edges of the compound so they blend seamlessly with the ceiling surface. The goal is to create a gradual taper. Let it dry completely (usually 24 hours).
- Sand and Apply a Second Coat: Once dry, lightly sand the first coat to knock down any high spots or ridges. Now, using your wider 10-inch taping knife, apply another thin coat, extending it another 2 inches beyond the first coat. This wider layer is key to making the patch invisible.
- Final Sanding: Let the second coat dry completely, then give it a final, careful sanding with a fine-grit sponge. Run your hand over it; it should feel perfectly smooth and level with the rest of the ceiling. If needed, apply a very thin final skim coat.
- Prime and Paint: This step is not optional. You must prime the patched area first, otherwise the porous joint compound will absorb the paint differently, and you will always see a dull spot (an effect called “flashing”). Once the primer is dry, apply two coats of your matching ceiling paint.
Solution 3: The Cover-Up – Quick and Creative Alternatives
If a full drywall patch seems too daunting, you have other stylish options.
Option A: Use a Decorative Ceiling Medallion
Ceiling medallions are traditionally used around chandeliers, but a modern, simple medallion can be a great way to cover a hole and add a deliberate architectural detail to your room.
Option B: Install a Larger Surface-Mount Fixture
This is the most practical cover-up. Replace the recessed downlight with a stylish surface-mounted fixture—like a slim LED dome light, a decorative flush-mount, or even the base of a new track lighting system—that has a base large enough to completely cover the old hole.
Option C: Use a “Blank-Up” Cover Plate
This is a simple, clean, and code-compliant solution. A blank-up plate is a flat, non-metallic disc designed to cover unused electrical openings. It provides a clean, white, paintable finish and is very easy to install.
Choosing the Right Solution for You: A Comparison
| Lösung | Best For… | Skill Level | Final Appearance |
|---|---|---|---|
| Goof Ring / Reducer Trim | Installing a new, smaller light in an existing oversized hole. | Beginner | Clean and professional, with a wider visible trim around the light. |
| Drywall Patch | Completely removing a light fixture for a perfectly smooth ceiling. | Intermediate | Invisible. The hole completely disappears. |
| Ceiling Medallion | Covering a hole while adding a decorative, traditional, or transitional design element. | Beginner | A deliberate, decorative feature. |
| Larger Surface Fixture | Swapping lighting styles and needing a practical way to cover the old hole. | Beginner (if fixture is lightweight) | The old hole is hidden by a new, more prominent light fixture. |
Final Word: Reclaiming Your Flawless Ceiling
A hole in the ceiling from an old downlight doesn’t have to be a permanent blemish on your design. As you can see, you have a full toolkit of solutions at your disposal. Whether you choose the clever simplicity of a goof ring, the satisfying perfection of a drywall patch, or a creative cover-up, you can absolutely fix downlight holes and restore the clean, seamless look of your space.
The key is to first decide on your goal, then choose the method that best suits your skills and your vision. With a little planning and patience, you can make that hole a distant memory.
Need help planning your new lighting layout or choosing the perfect fixtures to install?
Fixing the old holes is just the first step. Our team of lighting specialists can help you design a new lighting plan and select the right products to ensure your space is not just repaired, but completely transformed.
Contact us today for a professional consultation and let’s create your perfect ceiling.