 XHLUX
XHLUX
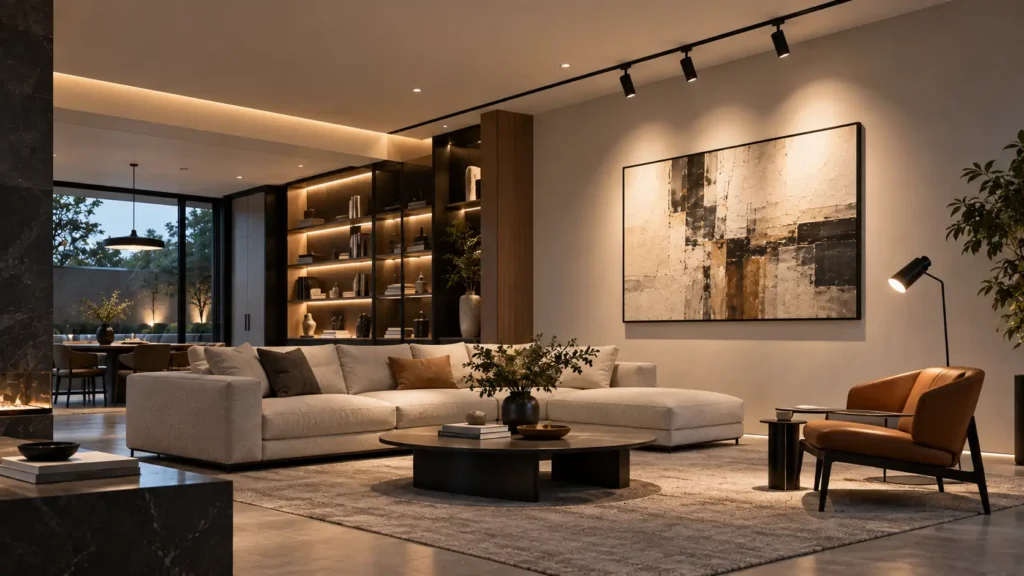
The furniture is already in the plan: sofa, table, artwork, shelving, circulation, work surfaces.
The lighting brief should not start with how many holes the ceiling can take.
Good interior lighting starts with what happens in the room, not with an empty ceiling grid.
That is the first move in interior lighting plan basics—before a family is shortlisted.
W skrócie: Start with room use, furniture and visual tasks. Decide what needs ambient, task and accent light. Then choose fixture types, positions and a buildable specification. A tidy grid that misses the table is not a lighting design.
Spis treści
- 💡 Quick answer: how do interior designers choose lighting?
- 🚶 1. Start with what happens in the room
- 🛋️ 2. Put furniture before fixture positions
- 🧱 3. Identify the surfaces that actually need light
- 📚 4. Build the lighting in layers
- 💡 5. Choose fixture types after the lighting job is clear
- 📏 6. How much light does each area need?
- 🔦 7. Think about beam, glare and distribution
- 🌡️ 8. Match CCT and dimming to the room
- 📋 9. Turn the design into a real specification
- ✅ 10. What should you check before the lighting pack is issued?
💡 Quick Answer: How Do Interior Designers Choose Lighting?
Start with the room’s use, furniture and visual tasks. Then decide what needs ambient, task and accent light before choosing fixture types and positions.
| Krok | What to settle |
|---|---|
| 1 | Room use |
| 2 | Furniture |
| 3 | Tasks |
| 4 | Layers |
| 5 | Fixture type |
| 6 | Pozycja |
| 7 | Specyfikacja |
Room use → furniture → tasks → layers → fixture type → position → specification.
🚶 1. Start With What Happens in the Room
Name the activity before you name the luminaire.
People in the room may be:
- sitting
- reading
- dining
- working
- browsing
- checking products
- walking
- viewing artwork
One room can hold more than one of those jobs. Lighting for the walk and lighting for the table are not the same brief.
The lighting brief starts with activity, not fixture style.
🎯 What comes first on the lighting brief?
The activity in each zone. Style is a later line, after the visual job is named.
🛋️ 2. Put Furniture Before Fixture Positions
This is the hinge of the sequence.
Fix the targets first:
- table
- sofa
- bed
- display
- shelving
- artwork
- counter
Then place the light.
Skip that order and you get familiar misses:
- a downlight landing behind furniture
- a spotlight that never reaches the artwork
- task light missing the work surface
- a neat ceiling grid that is awkward to use
Furniture gives the lighting a target.
🎯 Why does furniture come before cut-outs?
Because the table, sofa and art tell the light where to land. A grid without those targets is only a pattern.
🧱 3. Identify the Surfaces That Actually Need Light
Do not design only for the floor.
Interior lighting for designers has to name the faces that must be seen:
- horizontal surfaces
- powierzchnie pionowe
- walls
- shelves
- artwork
- tables
- counters
A room can feel “bright enough” and still leave the shelf label, the tabletop or the painting under-lit.
🎯 Is a bright floor enough?
No. The faces people actually look at—table, wall, shelf, artwork—still need their own light.
📚 4. Build the Lighting in Layers
Layered lighting design principles sit on the room-first sequence. They are not a three-layer costume every interior must wear.
Oświetlenie otoczenia
Sets general visibility so people can move and see the room as a whole.
Oświetlenie zadaniowe
Serves the working plane: reading, dining, counting, prep, checkout.
Oświetlenie akcentujące
Marks artwork, display, texture or an architectural emphasis.
Not every room needs all three. Each layer that you keep should do a different visual job.
Each layer should solve a different visual job.
🎯 Do I always specify three layers?
No. Add a layer only when the room has a job that layer can own. Empty layers are decoration.
💡 5. Choose Fixture Types After the Lighting Job Is Clear
Designer lighting selection criteria start after the job is named.
Downlighty
Useful for general, task or controlled ceiling light when the beam and position match the plane.
Spotlights / track lights
Useful when the job is aiming, accent, displays or artwork.
Oświetlenie liniowe
Useful for continuous runs: shelves, coves, long work surfaces.
Decorative fixtures
They can carry the visual character of the room. They do not automatically replace ambient or task light.
Choose the fixture after you know what the light has to do.
🎯 When is a fixture family chosen?
After the visual job is named. Appearance without a job is a catalogue browse, not a layout.
📏 6. How Much Light Does Each Area Need?
Do not use one “bright enough” number for the whole interior.
Judge each zone from:
- the task
- the working plane
- the surface
- kontrast
- the ambient level around it
- visual priority
If the project needs a numeric target, take it from the project standard or the local code for that space type.
Do not paste a generic lux list onto every sofa and every corridor.
🎯 Can one brightness cover the whole plan?
No. The table, the walk and the display ask for different light. Shared “enough” is a weak target.
🔦 7. Think About Beam, Glare and Distribution
Once the family is chosen, still ask how the light leaves the fixture.
Sprawdzać:
- kąt wiązki
- spill light
- blask
- shielding
- wall wash
- hotspot
- jednolitość
The same spotlight, left in the same position, can paint two different rooms if only the beam changes.
You do not need a full beam-angle handbook here. You need the distribution to match the target you already named.
🎯 Why does beam still matter after the family is picked?
Because the cone, the edge and the spill decide whether the target is lit—or the adjacent wall.
🌡️ 8. Match CCT and Dimming to the Room
Colour and control follow the room, not a habit Kelvin.
CCT
Do not pick 3000K or 4000K in isolation.
Read them against:
- materials
- finishes
- furniture
- room atmosphere
- neighbouring spaces
Ściemnianie
If the room will run more than one scene—daytime, evening, cleaning, event, display—set dimming in the concept, not as a late add-on.
🎯 When is dimming a design line, not an extra?
When the room will change scene. A single ON/OFF circuit cannot hold five moods.
📋 9. Turn the Design Into a Real Specification
Lighting specification for interior designers is where the picture becomes buildable.
“Black spotlight” is not a specification.
The issue sheet should make at least these lines clear:
- fixture type
- wattage / output
- kąt wiązki
- CCT
- CRI
- dimming / control
- finish
- mounting type
- quantity
- location
- aiming requirement
- IP rating if the location needs it
When you read a published commercial head sheet, an adjustable D90 round LED spot downlight shows how type, optic and finish sit on one page—then write the same completeness into the room you are issuing.
A lighting concept becomes buildable only when the visual intent is translated into specifications.
🎯 What turns a mood board into an issue sheet?
Named type, output, beam, CCT, control, finish, mount, count and location—not a colour adjective.
✅ 10. What Should You Check Before the Lighting Pack Is Issued?
Before the pack leaves the studio, walk the same sequence again.
Room
Has the use of any zone changed?
Furniture
Are final positions settled?
Lighting target
Where must the light land?
Fixture
Can the specified head actually do that job?
Kontrola
Do dimming and the control path match the scenes?
Instalacja
Do positions, cut-outs, track, drivers and access still line up?
🎯 What is the last studio check?
That use, furniture, target, fixture, control and install still tell one story.
❌ Common Mistakes
Mistake 1 — Starting with the ceiling grid
Lights first, furniture later.
Mistake 2 — Choosing fixtures by appearance first
The housing is chosen before the light has a job.
Mistake 3 — Lighting only the floor
Walls, shelves, tabletops and artwork are left out.
Mistake 4 — Using one lighting layer for everything
Every task is asked of the downlights.
Mistake 5 — Leaving beam angle and aiming until installation
The crew finds the miss on site.
Mistake 6 — Writing vague specifications
“Spotlight / warm white / dimmable” is not enough to build.
📝 Final Checklist — What Should Come Before Fixture Selection?
- [ ] What happens in the room?
- [ ] Where is the furniture?
- [ ] What surfaces need light?
- [ ] Which areas need ambient light?
- [ ] Which need task light?
- [ ] Which need accent light?
- [ ] What fixture type suits each job?
- [ ] What beam/distribution is required?
- [ ] What CCT and dimming strategy suit the room?
- [ ] Can the final intent be written clearly into the specification?
Co robić dalej
- Mark activities, furniture and the faces that must be seen—before you draw a grid.
- Assign ambient, task and accent only where each layer has a job, then write type, beam, CCT and control on the same line.
- Need a project review or quotation? Contact the XHLUX team with the furniture plan, the visual targets and the control scenes.
Start with the room. The fixture list gets easier after that.
🏁 Conclusion: How do interior designers choose lighting?
Interior designers choose lighting more effectively when they start with the room, not the fixture.
Understand the activity, furniture and visual targets first. The right fixture becomes much easier to choose after that.
Explore our related blog posts:
- Pomysły na strefowanie oświetlenia w nowoczesnych układach sklepów detalicznych
- Why Do Retail Stores Use Rail Spot Lights Instead of Downlights?
- Jaki kąt wiązki światła jest najlepszy dla komercyjnego oświetlenia szynowego?
![Czym jest ściemnialna lampa szynowa: najlepszy przewodnik [2025]](https://www.xhlux.com/wp-content/uploads/2025/06/Commercial-Surface-Track-Light-Solution-with-Adjustable-Dimming-560x560.webp "Czym jest ściemnialna lampa szynowa: najlepszy przewodnik [2025]")