XHLUX
XHLUX
Place a front porch recessed light where it helps someone find the door, read the house number, see the lock and cross the steps safely—not simply at the geometric centre of the ceiling.
Use this page when you need to turn the door, approach, steps, columns and seating into a practical ceiling layout.
If the mounting family and ceiling construction are still open, start here:
→ Installatiemethoden voor LED-downlights: Inbouw versus opbouw versus verstelbaar
If moisture exposure and IP protection are still open, check the wet- and damp-location guide:
→ IP65 waterdichte LED-downlights voor commerciële ruimtes met veel vocht.
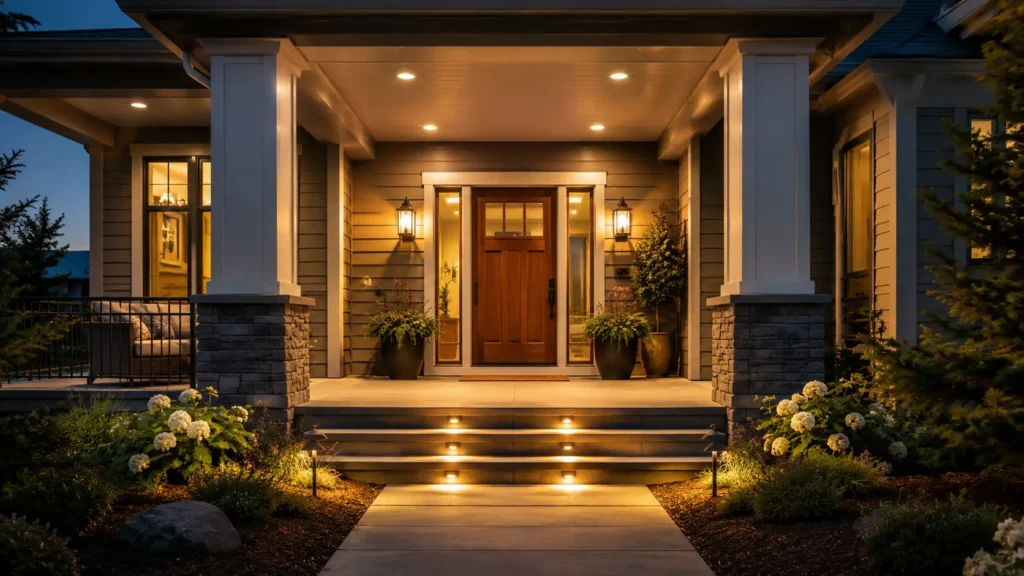
Kort samengevat: Start with the door, lock, steps and approach—not an even ceiling grid. Aim for overlapping light on useful surfaces, keep bright apertures out of the visitor’s sightline, and verify the complete fixture and driver for the actual outdoor exposure.
1. Map what the entrance must reveal
A useful porch ceiling lighting layout begins at eye and foot level. Mark these targets before drawing ceiling points:
- Door handle, lock and threshold
- House number, intercom or access reader
- Top and bottom of each step
- Main walking route from gate, path or driveway
- Visitor’s face at the door
- Parcel shelf or delivery position
- Columns, wall finish or planting that defines the entrance
One recessed light rarely serves every target well. A fitting directly above the doormat may light the floor but leave the visitor’s face in shadow. A row near the outside edge may brighten the approach while leaving the lock dark.
Decide which jobs belong to downlights and which are better handled by wall lanterns, step lights or landscape lighting. The reflected ceiling plan should follow the entrance tasks.
🎯 What should be marked before the ceiling points?
Mark the door hardware, steps, approach, house number and visitor position before placing any downlight.
2. Place light around the door—not over one centreline
For a shallow porch, one recessed light slightly forward of the door can cover the threshold and part of the approach. Check that the door leaf does not create a moving shadow across the lock or visitor.
For a wider porch, two fittings often work better than one central source. Place them symmetrically only if the architecture and required coverage are also symmetrical.
A deeper porch may need separate zones:
- Door zone for face, lock and threshold
- Step zone for level changes
- Approach zone connecting the porch to the path
- Seating or feature zone where applicable
Do not place a bright aperture directly in the sightline of someone walking toward the door. A deep baffle, controlled beam or position closer to a wall can reduce glare, but each choice changes the light pattern.
The green points show lighting jobs, not a universal three-light prescription. Final positions depend on the porch geometry and selected optic.
🎯 Where should the first porch downlight go?
Place it to reveal the lock, threshold and visitor area without sitting on the direct approach sightline.
3. Set spacing from beam overlap and porch depth
Porch soffit downlight spacing cannot be fixed from ceiling height alone. The selected beam, lumen output, setback from walls and porch depth all change the result.
Start with the beam footprint:
straaldiameter ≈ 2 × afstand tot doel × tan(straalhoek ÷ 2)
Use the result only as an initial geometry check. It does not predict maintained illuminance, surface brightness or glare.
Then review three kinds of overlap:
- Floor overlap so steps and walking routes do not alternate between bright and dark
- Vertical overlap on the door, wall and visitor’s face
- Transition overlap between porch light and the path or driveway lighting
A long row of closely spaced points can make the ceiling busy and produce repetitive bright pools. Too few narrow-beam fittings can leave dark gaps at the step edges. Test the exact optic at night before fixing a universal spacing ratio.
🎯 Is there one spacing rule for every porch?
No; spacing must follow beam distribution, mounting height, porch depth and the surfaces that need light.
4. Layer recessed lights with entrance fixtures
Recessed lights are discreet, but they mainly send light downward. Wall-mounted lanterns or sconces can light faces and door details more effectively because their light arrives from the side.
A balanced exterior entry lighting design may combine:
| Laag | Primary job | Main check |
|---|---|---|
| Recessed porch lights | Threshold, circulation and controlled ceiling light | Beam overlap and glare |
| Door sconces | Visitor’s face, lock and architectural identity | Mounting height and symmetry |
| Step lights | Level changes | Shielding and uniformity |
| Path or landscape lights | Transition to gate, path or driveway | No dark gap before the porch |
| House-number light | Address recognition | Visibility from the arrival direction |
Do not use more ceiling fittings to compensate for a missing vertical layer. Add the right light for the target.
DarkSky International’s responsible-outdoor-lighting principles favour useful, targeted, low-level and controlled light. On a porch, that means keeping light on the entrance and approach rather than spilling it into windows, neighbouring properties or the sky.
🎯 When should a wall light support the downlights?
Use a wall light when faces, door hardware or identity details need vertical illumination.
5. Verify outdoor exposure and ceiling construction
A covered porch is not automatically a dry location. Wind-driven rain, condensation, insects, dust, cleaning water and temperature changes can reach the fitting.
A weatherproof entryway downlight specification should identify:
- Whether the location is treated as dry, damp or wet under the applicable local rules
- The fixture’s environmental marking or IP rating
- Whether the rating applies to the front face or complete assembly
- Driver location and protection
- Gasket, trim and cut-out requirements
- Operating-temperature range
- Corrosion resistance of trim, springs and fixings
- Ceiling material, cavity depth and maintenance access
UL luminaire guidance distinguishes damp-location and wet-location markings; use the marking that matches the real exposure. IEC 60529 explains enclosure protection through IP codes, but an IP number does not replace regional electrical rules or manufacturer instructions.
Also check the surface that receives the cut-out. Vinyl soffit, timber lining, metal panel and plasterboard may require different support, clip ranges or sealing details. The complete assembly must remain accessible after installation.
🎯 Does a roof make every recessed light suitable outdoors?
No; classify the actual moisture exposure and verify the fixture, driver and installed assembly for that location.
6. Choose colour and controls for arrival
Warm light often makes an entrance feel welcoming, while higher colour temperatures can appear more functional. Do not choose CCT from a generic label alone; view it against the door colour, stone, timber, render and surrounding landscape.
For many hospitality-style entrances, 2700K–3000K is a useful sample range. The hospitality colour-temperature guide explains how warm and neutral light interact with finishes and atmosphere.
Controls may include:
- Dusk-to-dawn photocell
- Occupancy or motion sensor
- Timed scene
- Manual override
- Lower late-night level
- Integration with access or security systems
Confirm sensor coverage from the real approach direction. A sensor that triggers only after the visitor reaches the first step leaves the arrival route dark.
Avoid excessive output. More lumens can increase glare, flatten the façade and disturb neighbouring rooms without improving recognition at the lock or steps.
🎯 What should a night mock-up prove?
It should prove safe arrival, clear faces and door hardware, comfortable glare and controlled spill beyond the porch.
7. Approve the layout before cutting
Use one night mock-up with the actual beam, trim, CCT and control logic. Review it from the path, bottom step, doorway and inside looking out.
| Rekening | Pass condition | Warning sign |
|---|---|---|
| Door and lock | Hardware is easy to see | Downward shadow hides the lock |
| Visitor’s face | Recognizable without harsh brightness | Face is dark or strongly top-lit |
| Steps | Every edge is readable | Alternating bright and dark treads |
| Approach | No dark break before the porch | Path light ends too early |
| Verblinding | Apertures do not dominate arrival view | Bright source sits on the centreline |
| Spill | Light stays on useful property surfaces | Windows, neighbours or sky receive excess light |
| Weather fit | Rating and installation match exposure | Indoor-only assumptions under a covered roof |
| Onderhoud | Driver and seals remain accessible | Routine service requires ceiling damage |
Freeze the scheduled model, optic and driver after approval. Substituting a wider beam, brighter package or shallower trim can change the entire entrance effect.
Wat moet ik nu doen?
- Mark the door, lock, steps, visitor position and approach on the plan.
- Use the installation-methods and wet-location guides linked near the introduction to settle construction and exposure.
- Keep the broader soffit-selection, mount-comparison and installation-checklist articles in #260, #271 and #284.
- Test the selected beam and control response at night before repeating the layout.
- Send XHLUX the porch plan, soffit construction, exposure classification, mounting height, target surfaces and control method when shortlisting an OEM configuration.
- For indoor rooms and other application-led layouts, continue with Gidsen voor LED-downlights per ruimte en toepassing.
Veelgestelde vragen
Noten en bronnen
- UL Solutions — Luminaires Marking and Application Guide: dry-, damp- and wet-location luminaire markings.
- Internationale Elektrotechnische Commissie — IEC 60529: enclosure protection and IP-code classification.
- DarkSky International — Five Principles for Responsible Outdoor Lighting and home outdoor-lighting assessment guidance.
- User-provided Google PAA screenshots for
front porch recessed light, captured 2026-08-07; four relevant questions selected and screenshot answers excluded as evidence.