XHLUX
You need to replace a recessed 115mm cut out downlight whose ceiling hole is labelled about 115mm.
The risk is treating “115mm” as a universal fit code. Cut-out size, fixture outer diameter, trim cover, installation depth, spring clips and the driver are separate checks. Only when those line up can you swap the fitting without unnecessary ceiling repair.
This guide walks through that decision in purchase order: what 115mm means, what to measure, what to buy, what to do when sizes disagree, and a final checklist before you order.
For how recessed and surface options fit different ceilings, see our LED downlight installation methods guide.
TL;DR: 115mm is the ceiling cut-out, not the fixture diameter. Measure the real hole, fixture OD, depth, ceiling thickness and driver before ordering. Match the new cut-out rating, trim cover and retention method to that hole. Reuse the old driver only when electrical and dimming data match. A complete purchase checklist beats buying on the “115mm” label alone.
Table of contents
- 1. What 115mm means
- 2. Can you swap like-for-like?
- 3. How to measure
- 4. What size to buy
- 5. When sizes do not match
- 6. Driver replacement
- 7. Other checks
- 8. Purchase checklist
- FAQ
- Conclusion
📏 1. What Does a 115mm Downlight Cut-Out Actually Mean?
115mm is the ceiling opening the fitting is designed for, not the visible diameter of the downlight.
Cut-Out Is Not Outer Diameter
On datasheets, “115mm cut-out” (or cut-out / aperture) means the recommended hole in the ceiling board. The fixture body and springs must pass through that hole and latch onto the board from above or behind.
The outer diameter, or face size, is larger. That ring sits on the room side of the ceiling and hides the rough edge of the hole.
Why the Fixture OD Is Usually Larger Than 115mm
If the visible ring matched the hole exactly, any irregular cut or slightly oversized opening would show as a gap. Manufacturers therefore publish a larger outer diameter and a cover diameter so the trim overlaps the board around the cut-out.
Why “115mm Cut-Out” Alone Does Not Prove a Swap Will Work
Two products can both list a 115mm cut-out and still differ in:
- how large the trim must be to hide the hole you actually have;
- how deep the housing and heat sink need to sit;
- how the springs or clips grip the board;
- whether the driver sits remote, in a canopy, or as part of an integrated module.
So a label match is a starting filter, not a drop-in guarantee.
🎯 Is 115mm the size of the visible ring?
No. It is the ceiling opening; the visible ring is usually larger so it covers the hole.
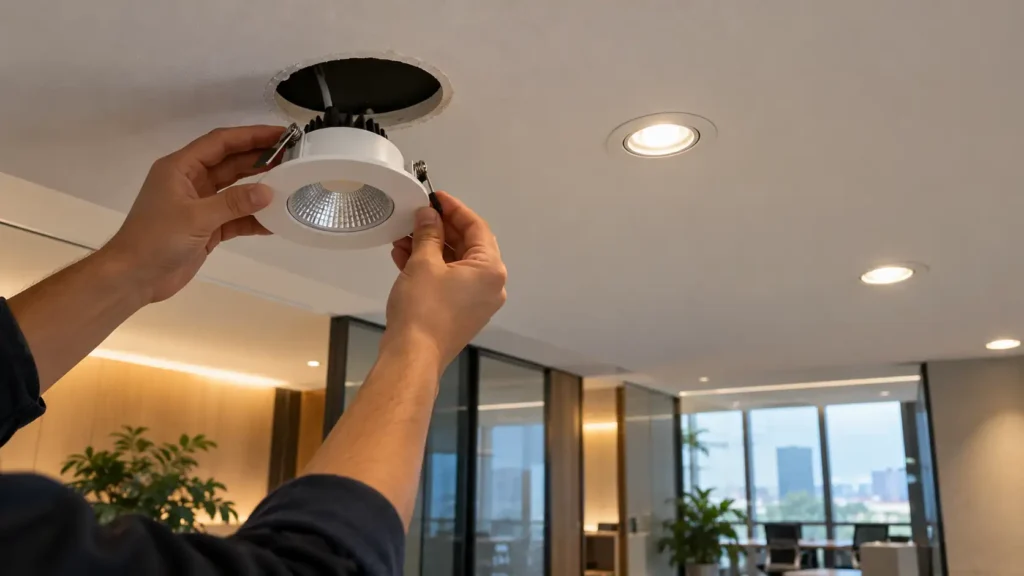
🔄 2. Can You Replace an Old Downlight With a 115mm Cut-Out Model?
Only if the new fitting’s cut-out rating, outer diameter, depth, retention method and driver plan all match the opening and ceiling you already have.
Check these together before you buy:
- Existing cut-out: measure the real hole, even if the old label said 115mm.
- New cut-out requirement: the datasheet value the replacement is designed for.
- Fixture outer diameter / trim cover: must hide the hole you measured.
- Installation depth: housing plus any remote driver clearance above the board.
- Spring clips / fixing method: must suit the ceiling thickness and board type.
- Driver position and size: remote, integral, or a different module format.
“Both say 115mm cut-out” does not mean the two fittings are interchangeable. One may need a deeper void; another may have a smaller face that leaves a ring of plaster visible; a third may use clips that do not grip your board thickness.
Ceiling type still matters. Plasterboard voids, concrete soffits and shallow suspended ceilings limit depth differently — see how to choose downlights for different ceiling types.
🎯 Is a matching cut-out label enough to order?
No. Depth, trim cover, clips and the driver plan can still stop a clean swap.
📐 3. How Do You Measure an Existing 115mm Downlight Before Buying?
Measure the real ceiling opening and the old fitting’s cover and depth, then record void space and driver size before you shortlist products.
Measure the Existing Ceiling Cut-Out
Remove or carefully drop the old fitting so you can see the board edge. Measure the actual opening in the ceiling, not the painted face of the old trim.
Note whether the hole is round or irregular, and whether it has been enlarged over earlier replacements.
Measure the Existing Downlight
Record:
- fixture outer diameter (face / trim);
- the cut-out the old product claimed;
- overall depth of the housing;
- ceiling board thickness;
- driver dimensions and whether it sits beside the housing or remote.
Check the Space Above the Ceiling
Look for limits that rule out many replacements:
- Shallow voids in suspended ceilings;
- Concrete with little or no void;
- Limited access above the board for a remote driver;
- Insulation or services that reduce clear depth.
Five measurements to take to purchasing:
| # | Measurement | Why it matters |
|---|---|---|
| 1 | Actual cut-out diameter | Sets which cut-out ratings and trim sizes can cover the hole |
| 2 | Old fixture OD / trim cover | Shows how much face size worked on this hole |
| 3 | Housing depth | Filters products that need more void than you have |
| 4 | Ceiling board thickness | Must suit the spring or clip range |
| 5 | Driver size and location | Decides reuse, remote placement or an integrated module |
🎯 Should you measure the old trim or the hole?
Measure the hole in the board; the trim size only shows what covered it before.
🛒 4. What Size Downlight Should a 115mm Cut-Out Use?
Buy a fitting whose declared cut-out matches your measured hole, and whose outer diameter fully covers that hole — never size the purchase from the “115mm” word alone.
Cut-Out Size Is Not Fixture Outer Diameter
A product for a 115mm cut-out still needs a published face diameter. That face must be larger than the hole. If your hole has grown beyond 115mm, you may need a larger trim even when the datasheet still says 115mm cut-out.
Use the Trim-to-Hole Relationship
Ask the supplier for:
- recommended cut-out;
- fixture OD / bezel diameter;
- maximum hole the trim can still cover cleanly;
- spring range for board thickness.
For high ceilings and larger apertures, coverage and beam also interact — see large downlight cut-out, beam and spacing.
| Existing opening | What to check |
|---|---|
| About 115mm | New product’s declared cut-out and published OD |
| 115mm and slightly oversized | Trim cover diameter vs the real hole |
| Smaller than the new cut-out | Whether enlarging the hole is acceptable on site |
| Larger than the trim can cover | Larger bezel, adapter plate, or a different product family |
🎯 Can you buy by the 115mm number alone?
No. Match cut-out rating and trim cover to the hole you measured.
🔧 5. What If the New Downlight Does Not Match the 115mm Cut-Out?
Treat mismatch as a design choice: change the hole, change the product, or add a cover method — do not force a fitting that will not sit or will leave a gap.
New Cut-Out Requirement Is Smaller Than 115mm
If the new fitting expects a smaller hole than you have:
- springs may not grip correctly in an oversize opening;
- the face may not centre or may leave a visible ring;
- forcing the housing can damage clips or the board.
Prefer a product rated for your measured hole, or a larger trim the manufacturer documents for that opening. Do not rely on “it will squeeze in.”
New Cut-Out Requirement Is Larger Than 115mm
If the new fitting needs a bigger hole:
- enlarging the cut-out is a ceiling works item;
- if you must keep the board as-is, look for a product that covers the existing hole with a larger face;
- check OD and cover diameter before ordering.
Trim Cover Is Not Enough Even When the Body Fits
A housing can pass through the hole and still look wrong if the bezel does not hide the opening. Fitting through the hole is not the same as a finished, secure install.
🎯 Is “it fits through the hole” enough?
No. The trim must cover the opening and the clips must hold for your board thickness.
⚡ 6. Do You Need to Replace the Driver When Changing a 115mm Downlight?
Replace or re-specify the driver whenever the new LED module’s electrical and dimming requirements differ from the old supply — same cut-out size never proves the driver can stay.
Check:
- the existing driver type and condition;
- new driver input voltage and supply arrangement;
- output voltage / current and LED module match;
- dimming protocol (phase-cut, 0–10V, DALI, and so on);
- driver physical size and mounting space;
- connector / terminal type.
Integrated LED downlights often ship as a matched head-plus-driver set. The old remote driver may not suit the new module at all. For dimmable projects, match the dimmer and driver combination, not only the wattage label on the head.
🎯 Can two 12W heads share one old driver?
Only if the module’s output and dimming match that driver; wattage alone is not enough.
💡 7. What Else Should You Check Besides the 115mm Cut-Out?
After size and driver, check light quantity, distribution, colour, dimming and glare so the replacement matches how the room is used.
Light Output
Compare delivered lumens, not wattage alone. A 12W label does not fix brightness; efficacy and optic losses differ by product.
Beam Angle
Pick the optic for the task: general ambient, accent, retail display, corridor, or hospitality feature. The same cut-out can take narrow or wide beams with very different results.
Colour Temperature and CRI
If the old ring of fittings is 3000K, a 4000K replacement will change the look of materials and skin tones in that zone.
For how those two CCTs differ in practice, see how to choose between 3000K and 4000K spotlights. Ask for CRI (and R9 where colour-critical) as well as CCT.
Dimming and Control
Match the existing dimming system. A “dimmable” label is not a universal compatibility claim.
Glare
In commercial spaces, a successful mechanical fit still fails if glare is too high for desks, reception or display viewing. Optical depth and shielding matter — see whether an anti-glare spotlight really reduces glare.
🎯 Is wattage enough to keep the same brightness?
No. Compare lumens, optic and aiming; wattage is only input power.
📋 8. 115mm Cut-Out Downlight Replacement Purchase Checklist
Use this table before you sign off a quotation — each row is a separate go/no-go check, not a summary of the article.
| Check item | Status |
|---|---|
| Existing cut-out measured (target class: 115mm) | ☐ |
| New product declared cut-out | ☐ |
| Fixture OD / trim cover vs real hole | ☐ |
| Ceiling board thickness | ☐ |
| Installation depth / void clearance | ☐ |
| Retention method (springs / clips) | ☐ |
| Driver compatibility | ☐ |
| Supply / input voltage | ☐ |
| Dimming compatibility | ☐ |
| Delivered lumens | ☐ |
| Beam angle | ☐ |
| CCT / CRI | ☐ |
Send this list with photos of the opening and the old driver label when you request samples or a quotation.
FAQ
🏁 Conclusion: How Do You Replace a 115mm Cut-Out Downlight?
Replacing a 115mm cut-out downlight is not as simple as ordering another product marked “115mm.” Before you buy, match the measured opening, the fixture outer diameter and trim cover, the ceiling depth, the retention method, the driver and the electrical / dimming plan.
Only when those conditions line up can you aim for a swap without unnecessary ceiling modification. Use the purchase checklist, and bring measured hole size, old face diameter and control type to the quotation stage.
Explore our related blog posts:
- Wholesale LED Downlights Buying Guide
- How Bright Is a 5W COB Spotlight?
- Is 4000K the Right CCT for Artwork Spotlights?
115mm Cut-Out LED Downlights for Commercial Projects
XHLUX manufactures commercial LED downlights, including adjustable and anti-glare options. Cut-out, wattage, CCT, CRI, beam and dimming vary by series; we specify them model by model. OEM/ODM configuration is available when a project needs a defined cut-out and optical package.
If you already have an existing 115mm-class cut-out, project quantity, and target CCT / CRI / beam angle, send those details for a configuration review against your measured opening and control type.