XHLUX
XHLUX
The search wording downlight in bedroom points to one practical question: where can ceiling light help without shining into the eyes of someone lying in bed?
Use this page when you need to place light around the bed, wardrobes, doorway and reading positions instead of forcing a symmetrical ceiling grid.
Если варианты установки — встраиваемые, накладные или регулируемые — еще не рассматривались, начните с этого:
→ Способы установки светодиодных потолочных светильников: встраиваемые, накладные и регулируемые.
If colour temperature is still open for a bedroom or guest-room scheme, compare the hospitality options:
→ Теплое и нейтральное освещение для проектов отелей и ресторанов.
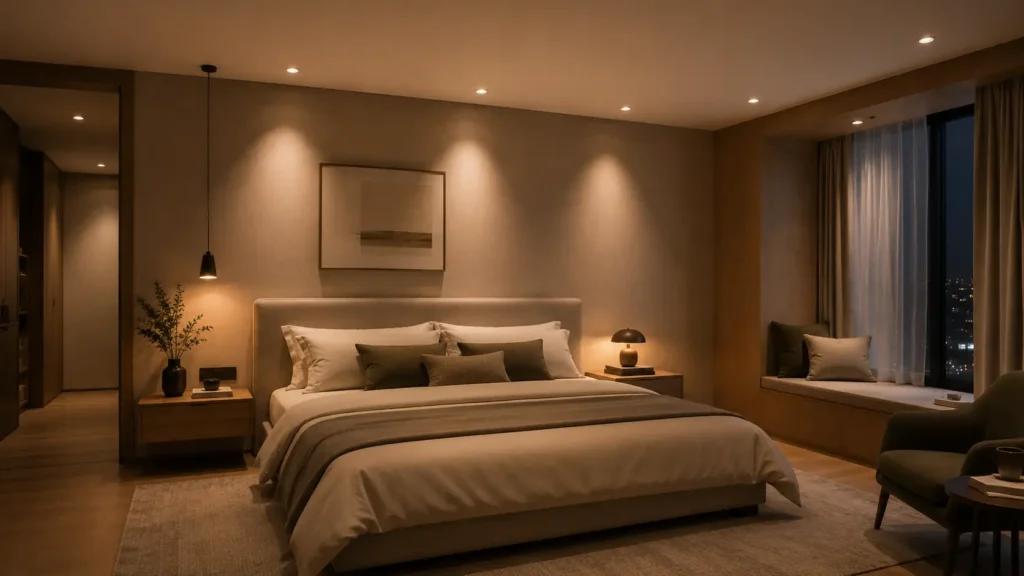
Вкратце: Place bedroom downlights around useful surfaces and walking routes, not directly above pillows. Verify quantity, beam overlap, glare and dimming from the real furniture plan before cutting the ceiling.
1. Map the bedroom before placing any lights
A useful bedroom ceiling lighting layout begins below the ceiling. Mark the bed, pillows, storage, mirror, desk, doorway and bathroom route.
Then assign a lighting job to each area:
- Circulation light for entering and moving around safely
- Vertical light for wardrobes, mirrors and faces
- Task light for reading, dressing or working
- Low-level evening light for winding down
- Cleaning light when the room needs full output
Do not ask every downlight to perform every job. A central grid may light the floor while leaving wardrobes dark and bright sources above the bed.
The reflected ceiling plan should follow the room plan. If furniture is provisional, delay final cut-outs.
🎯 What should be fixed before the ceiling grid?
Fix the bed, storage, task positions and walking routes before assigning a location to each ceiling light.
2. Keep downlights away from the pillow sightline
The most important rule for bedroom downlight placement is simple: do not put an exposed bright aperture directly above the pillows.
Someone lying down views the ceiling differently from someone standing. A fitting comfortable from the doorway can dominate the view from the bed.
Move the row toward the foot of the bed, use deeper-recessed optics or light wardrobes and walls instead. Check beam, cut-off and room geometry.
Avoid reflections in televisions, glossy doors and mirrors. Check the reflected path from the bed, not only the floor plan.
The green points are layout prompts, not a universal six-light prescription; verify them against the exact room and optic.
🎯 Where should downlights not go?
Keep exposed bright apertures away from pillow sightlines and any direct reflection path into a screen or mirror.
3. Put light where the room needs to see
A row near the wardrobe can light doors and clothing better than one over empty floor. Set it back enough to reduce user shadow.
At the entrance, reveal the circulation path. At a mirror, vertical light usually handles faces better than one overhead beam.
A downlight for bedroom use should therefore have a defined target. If nobody can name what a fitting illuminates, question whether it belongs in the plan.
Reading needs its own controllable layer. A bedside wall light, pendant or task fitting gives better local control than the whole ceiling.
🎯 What is a useful downlight position?
A useful position sends light to a wardrobe, walking route, task plane or wall rather than to an arbitrary grid point.
4. Estimate how many downlights the room needs
Do not begin with “one fitting per square metre.” Start with useful surfaces, luminaire output and other lighting layers.
Неуклюжая поисковая фраза how many downlight for bedroom is best treated as a calculation question, not a request for a universal count.
For an early ambient-light estimate:
number of luminaires ≈ (target lux × room area) ÷ (lumens per luminaire × utilization factor × maintenance factor)
Consider a 12 m² bedroom with an initial ambient target of 100 lux. If the selected downlight delivers 600 lumens, and the preliminary utilization and maintenance factors are 0.60 and 0.80:
(100 × 12) ÷ (600 × 0.60 × 0.80) = 4.17
That result suggests testing four or five fittings, not automatically installing five. Other layers, reflectance and beam distribution may change the quantity.
This is an estimate, not a code value. Final selection needs the exact photometry and, where comfort matters, a mock-up.
🎯 Is room area enough to decide quantity?
No; quantity also depends on delivered lumens, optics, surface reflectance, other light layers and the required scene.
5. Set spacing from the optic, not a stock ratio
Bedroom ceiling downlight spacing must account for mounting height, beam distribution, lumen package and the surfaces being lit.
A narrow beam creates bright pools and gaps. A wide beam improves overlap but may expose more source brightness.
Use this sequence:
- Set the target plane: floor, wardrobe face, desk or wall.
- Measure the distance from the luminaire to that plane.
- Select the exact lumen package, beam and trim.
- Plot initial positions using the manufacturer’s photometry.
- Check the midpoint between fittings and the room perimeter.
- View the apertures while standing, sitting and lying down.
- Adjust positions before ceiling coordination.
Wall offset is not automatically half the fixture spacing; reflectance, wall brightness and wardrobe depth can change it.
🎯 What determines bedroom downlight spacing?
Use mounting height, the exact beam distribution and the target surface instead of copying a fixed metre rule.
6. Layer and dim the lighting
Comfortable warm bedroom lighting combines ceiling light for circulation, local reading light and a low-level night route.
ENERGY STAR explains that lower Kelvin values appear warmer and identifies 2200–3000 K as a range used by some downlights to resemble incandescent light. Finishes, daylight and atmosphere still affect the choice.
A dimmable bedroom downlight needs more than “dimmable” on a quotation. Check the driver, control method, compatibility list, stable minimum and multi-fitting performance.
ENERGY STAR warns that not every LED works well with every dimmer. The U.S. Department of Energy distinguishes dim-to-warm products, which lower output and CCT together, from tunable-white systems that may control them separately.
For a broader driver and protocol comparison, use the recessed LED spotlight control guide.
For bedrooms and guestrooms, useful control groups often include:
- General ceiling downlights
- Bedside reading lights
- Wardrobe or dressing light
- Entrance and bathroom-route light
- All-off control accessible from the bed
🎯 What makes bedroom dimming usable?
Specify compatible drivers and controls, a stable low end and separate groups for ceiling, bedside and route lighting.
7. Adjust the plan for a guest room
Hotel and rental guests should understand controls without instructions. Keep switching predictable and provide an obvious bedside all-off.
Guest room downlight spacing follows the same photometric principles as a private bedroom, but repeatability matters more. A small layout error multiplied across 100 rooms becomes a procurement and guest-comfort problem.
Build one typical room with the real furniture, finishes, luminaires and controls. Review it from the doorway, mirror and both pillows.
Do not assume one ceiling plan fits every room type. Accessible, twin-bed and sofa-bed rooms change sightlines and tasks.
🎯 What should a guest-room mock-up prove?
It should prove sightline comfort, wardrobe and task lighting, control clarity and repeatable installation before rollout.
8. Check the layout before cutting the ceiling
Use a final review that tests the room from the occupant’s perspective, not only from the drawing sheet.
| Проверять | Pass condition | Warning sign |
|---|---|---|
| Bed sightline | No exposed bright source dominates from either pillow | Aperture sits directly above the headboard or pillow |
| Wardrobe | Doors and clothing receive useful vertical light | User’s body blocks a ceiling beam |
| Mirror | Face has balanced vertical light | One overhead spot creates hard facial shadows |
| Spacing | Midpoints and edges meet the intended light level | Bright pools alternate with dark gaps |
| Элементы управления | Each layer is obvious and reachable | One switch turns on every source |
| Затемнение | Low level is stable and visually comfortable | Flicker, pop-on, dropout or audible noise |
| Screen | No bright ceiling reflection from the bed | Downlight appears in the screen or glossy panel |
| Обслуживание | Driver and fitting remain accessible | Routine replacement requires ceiling damage |
Common mistakes are planning before furniture, counting before optics, relying on one layer and approving dimming without a compatibility test.
🎯 When is the bedroom layout ready?
Approve it only after the furniture plan, photometry, bed sightlines, controls and one real-room test agree.
Что делать дальше?
- Freeze the bed, wardrobe, mirror and desk positions before issuing the reflected ceiling plan.
- Use the installation and hospitality-colour guides linked near the introduction to settle construction and CCT.
- Review the smart-downlight control draft separately if app, voice or scene commissioning is part of the brief.
- Build one sample room with the scheduled optic, trim, driver and controls before a multi-room rollout.
- Send XHLUX the room plan, ceiling height, target surfaces, control method and photometric requirements when shortlisting an OEM downlight family.
- Compare this bedroom plan with other room-specific layouts in Руководства по выбору светодиодных потолочных светильников в зависимости от помещения и области применения..
Часто задаваемые вопросы
Примечания и источники
- ENERGY STAR — Light Fixtures (Downlights): colour appearance, Kelvin ranges and LED-dimmer compatibility guidance; cited in Section 6.
- U.S. Department of Energy — Understanding LED Color-Tunable Products: dim-to-warm and tunable-white behaviour and control considerations; cited in Section 6.
- The quantity calculation in Section 4 is a transparent preliminary example, not a universal bedroom illuminance requirement or substitute for project photometry.